Showing posts with label AWS IAM. Show all posts

Monday, 13 October 2025

Policy types in AWS


There are several types of AWS policies, but the primary and most commonly referenced categories are identity-based policies and resource-based policies.

Main AWS Policy Types


Identity-based policies are attached to AWS IAM identities (users, groups, or roles) and define what actions those entities can perform on which resources.​


Resource-based policies are attached directly to AWS resources (such as S3 buckets or SNS topics), specifying which principals (identities or accounts) can access those resources and what actions are permitted.​

Resource-based policy example:

{
   "Version": "2012-10-17",
   "Id": "Policy1415115909152",
   "Statement": [
     {
       "Sid": "Access-to-specific-VPCE-only",
       "Principal": "*",
       "Action": "s3:GetObject",
       "Effect": "Allow",
       "Resource": ["arn:aws:s3:::yourbucketname",
                    "arn:aws:s3:::yourbucketname/*"],
       "Condition": {
         "StringEquals": {
           "aws:SourceVpce": "vpce-1a2b3c4d"
         }
       }
     }
   ]
}


Other AWS Policy Types

In addition to the above, AWS supports several other policy types, including:
  • Managed policies (AWS managed and customer managed)
  • Inline policies (directly embedded on a single identity)
  • Permissions boundaries (set maximum permissions for identities)
  • Service Control Policies (SCPs, used in AWS Organizations)
  • Access Control Lists (ACLs, primarily for resources like S3 buckets)
  • Session policies (restrict permissions for sessions created with temporary credentials).​
While identity-based and resource-based are the two fundamental categories most often discussed, the broader IAM ecosystem incorporates additional forms for more advanced governance and restrictions.​


How do resource-based and identity-based policies differ?


Resource-based and identity-based policies in AWS differ primarily in their attachment location and in how they control access permissions to AWS resources.​

Key Differences


Identity-based policies are attached to IAM entities (users, groups, or roles) and specify what actions these identities can perform on which resources. For example, an IAM user can have a policy that permits reading from specific DynamoDB tables or starting EC2 instances.​

Resource-based policies are attached directly to AWS resources (such as S3 buckets, SNS topics, or KMS keys). These policies define which principals (users, roles, accounts) can access the resource and what actions they are allowed to perform. Resource-based policies allow for fine-grained control, including granting access to principals outside of the resource owner’s AWS account.​

Attachment and Usage


Identity-based policies are managed at the IAM level and generally offer broader access control for multiple resources through one principal.​

Resource-based policies are applied specifically to resources and are used when the access control needs to be defined at the resource level, possibly for cross-account or external identity access.​

Policy Evaluation


When a request to access a resource is made, AWS evaluates all applicable identity-based and resource-based policies together.

An explicit 'Deny' found in any policy will override any 'Allow' statements, ensuring comprehensive and secure permission management.​

Both types can be used separately or together, depending on security architecture and the granularity of control required for identities and resources.


If resource based policy allows access to some user, do we need a separate identity-based policy which allows access to that resource to be attached to that user?


If a resource-based policy allows access to a user, there is generally no need to attach a separate identity-based policy for that specific action—access will be granted solely based on the resource-based policy's allowance.​​

Details on Policy Evaluation Logic


When a request is made, AWS checks both identity-based and resource-based policies that apply to the request.​

If any policy contains an explicit 'Deny', access is denied regardless of any 'Allow' statements elsewhere.​

If at least one policy (whether identity-based or resource-based) contains an 'Allow' and there are no explicit Deny statements, the action is permitted.​​

For resource-based policies, the permission is granted directly to the designated principal (user or role), even if the user or role does not have a corresponding identity-based policy that allows the action.​​

In cross-account scenarios, both the identity-based policy in the requesting account and the resource-based policy on the target resource must allow the action; otherwise, access is denied.​

A user can be granted access solely by a resource-based policy, but if finer-grained or multiple permissions are needed across various resources, identity-based policies are beneficial. A resource-based policy alone can grant access to a user, without needing a separate identity-based policy for that resource and action—the access will work as long as the resource-based policy allows it and there is no explicit deny elsewhere. AWS evaluates all applicable identity-based and resource-based policies for a request; if any presents an explicit deny, access is rejected, but if at least one policy allows the action, access is permitted.​​

This means a user with no identity-based permission, but with permission in a resource-based policy, can still access that specific resource unless a deny blocks them. However, in cross-account situations, both a corresponding identity-based policy in the user's account and a resource-based policy in the resource owner's account must allow the action for access to succeed.

Are policies listed in IAM in AWS Console, only identity-based policies?


Yes, the policies listed in the IAM section of the AWS Console are only identity-based policies—specifically managed policies and inline policies that are attached to IAM users, groups, or roles.​

IAM policies you see under "Policies" are either AWS managed, customer managed, or inline identity-based policies.​

Resource-based policies (such as S3 bucket policies, SNS topic policies, or Lambda resource policies) are not centrally listed in IAM “Policies” in the Console; instead, they are managed from the respective resource consoles (e.g., via the S3 or Lambda management screens).​

The IAM Console does not display resource-based policies in the Policies list, since these are stored on resources, not IAM identities.​

To summarize, only identity-based policies—managed and inline—are listed in the IAM policies view in the AWS Console. Resource-based policies are managed and reviewed from the console page of each AWS service resource

---

Friday, 27 June 2025

GitHub Workflows and AWS


GitHub workflow can communicate with our AWS resources, directly (via AWS CLI commands) or indirectly (via e.g. Terraform AWS provider).

Before running AWS CLI commands, deploying AWS infrastructure with Terraform, or interacting with AWS services in any way we need to include a step which configures AWS credentials. It ensures that the workflow runner is authenticated with AWS and knows which region to target.

This step should contain configure-aws-credentials action provided by AWS. This action sets up the necessary environment variables so that AWS CLI commands and SDKs can authenticate with AWS services.

aws-region input sets the default AWS region to us-east-2 (Ohio). All AWS commands run in later steps will use this region unless overridden.

We can use either IAM user or OIDC (temp token) authentication.

IAM User Authentication


If using IAM user authentication, we can store user's credentials in a dedicated GitHub secrets:

env:
    AWS_ACCOUNT_ID: ${{ secrets.AWS_ACCOUNT_ID }}
    AWS_ACCESS_KEY_ID: ${{ secrets.AWS_ACCESS_KEY_ID }}
    AWS_SECRET_ACCESS_KEY: ${{ secrets.AWS_SECRET_ACCESS_KEY }}
    AWS_REGION: us-east-2

// Define this step before steps which are accessing AWS:

- name: Configure AWS Credentials
     uses: aws-actions/configure-aws-credentials@v2
     with:
        aws-region: ${{ env.AWS_REGION }}

 OpenID Connect (OIDC) Authentication


In this authentication, configure-aws-credentials GitHub Action uses GitHub's OpenID Connect (OIDC) for secure authentication with AWS. It leverages the OIDC token provided by GitHub to request temporary AWS credentials from AWS STS, eliminating the need to store long-lived AWS access keys in GitHub Secrets. 

Note that we now need to grant the workflow run a permissions for write access to the id-token:
id-token: write allows the workflow to request and use OpenID Connect (OIDC) tokens. The write level is required for actions that need to generate or use OIDC tokens to authenticate with external systems. Granting id-token: write is essential for workflows that use OIDC-based authentication, such as securely assuming AWS IAM roles via GitHub Actions. This enables secure, short-lived authentication to AWS and other cloud providers. This permission is a security best practice for modern CI/CD workflows that use OIDC to authenticate with cloud providers, reducing the need for static secrets.


env:
    AWS_REGION: us-east-2

permissions:
  id-token: write # aws-actions/configure-aws-credentials (OIDC)

...
- name: Configure AWS Credentials
    uses: aws-actions/configure-aws-credentials@v4
    with:
        role-to-assume: arn:aws:iam::123456789012:role/github-actions-role
        role-session-name: my-app
        aws-region:  ${{ env.AWS_REGION }}


Here's how it works: 
  1. GitHub OIDC Provider: GitHub acts as an OIDC provider, issuing signed JWTs (JSON Web Tokens) to workflows that request them.
  2. configure-aws-credentials Action: This action, when invoked in a GitHub Actions workflow, receives the JWT from the OIDC provider.
  3. AWS STS Request: The action then uses the JWT to request temporary security credentials from AWS Security Token Service (STS).
  4. Credential Injection: AWS STS returns temporary credentials (access key ID, secret access key, and session token) which the action injects as environment variables into the workflow's execution environment.
  5. AWS SDKs and CLI: AWS SDKs and the AWS CLI automatically detect and use these environment variables for authenticating with AWS services.

Benefits of using OIDC with configure-aws-credentials:
  • Enhanced Security: Eliminates the need to store long-lived AWS access keys, reducing the risk of compromise.
  • Simplified Credential Management: Automatic retrieval and injection of temporary credentials, simplifying workflow setup and maintenance.
  • Improved Auditing: Provides better traceability of actions performed within AWS, as the identity is linked to the GitHub user or organization. 

Before using the action:
  • Configure an OpenID Connect provider in AWS: We need to establish an OIDC trust relationship between GitHub and our AWS account.
  • Create an IAM role in AWS: Define the permissions for the role that the configure-aws-credentials action will assume.
  • Set up the GitHub workflow: Configure the configure-aws-credentials action with the appropriate parameters, such as the AWS region and the IAM role to assume. 

In an OpenID Connect (OIDC) authentication scenario, the aws-actions/configure-aws-credentials action creates the following environment variables when assuming a role with temporary credentials: AWS_ACCESS_KEY_ID, AWS_SECRET_ACCESS_KEY, and AWS_SESSION_TOKEN. These variables are used by the AWS SDK and CLI to interact with AWS resources. 

Here's a breakdown:
  • AWS_ACCESS_KEY_ID: This environment variable stores the access key ID of the temporary credentials. 
  • AWS_SECRET_ACCESS_KEY: This environment variable stores the secret access key of the temporary credentials. 
  • AWS_SESSION_TOKEN: This environment variable stores the session token associated with the temporary credentials, which is required for operations with AWS Security Token Service (STS). 

These environment variables are populated by the action after successful authentication with the OIDC provider and assuming the specified IAM role. The action retrieves the temporary credentials from AWS and makes them available to subsequent steps in the workflow. 


Once AWS authentication is done and this env variables are created, the next steps in the workflow can access our AWS resources, e.g. read secrets from AWS Secrets Manager:

- name: Read secrets from AWS Secrets Manager into environment variables
    uses: aws-actions/aws-secretsmanager-get-secrets@v2
    with:
        secret-ids: |
            my-secret
        parse-json-secrets: true

- name: deploy
    run: |
        echo $AWS_ACCESS_KEY_ID
        echo $AWS_SECRET_ACCESS_KEY
    env:
        MY_KEY: ${{ env.MY_SECRET_MY_KEY }}

This example assumes that in AWS secret my-secret we have a key MY_KEY, set to the secret value we want to fetch and use.

Saturday, 8 June 2024

Access types in Amazon EKS


Types of access in EKS


Access to Kubernetes APIs


Our cluster has an Kubernetes API endpoint. Kubectl uses this API. We can authenticate to this API using two types of identities:
  • An AWS Identity and Access Management (IAM) principal (role or user)
  • A user in our own OpenID Connect (OIDC) provider
    • Requires authentication to our OIDC provider
    • setup: Authenticate users for your cluster from an OpenID Connect identity provider - Amazon EKS
    • We can associate one OIDC identity provider to our cluster.
    • Kubernetes doesn't provide an OIDC identity provider. We can use an existing public OIDC identity provider, or we can run our own identity provider.
    • The issuer URL of the OIDC identity provider must be publicly accessible, so that Amazon EKS can discover the signing keys. Amazon EKS doesn't support OIDC identity providers with self-signed certificates.
    • Before we can associate an OIDC identity provider with our cluster, we need the following information from our provider:
      • Issuer URL - The URL of the OIDC identity provider that allows the API server to discover public signing keys for verifying tokens. The URL must begin with https:// and should correspond to the iss claim in the provider's OIDC ID tokens. In accordance with the OIDC standard, path components are allowed but query parameters are not. Typically the URL consists of only a host name, like https://server.example.org or https://example.com. This URL should point to the level below .well-known/openid-configuration and must be publicly accessible over the internet.
      • Client ID (also known as audience) - The ID for the client application that makes authentication requests to the OIDC identity provider.
We can't disable IAM authentication to our cluster, because it's still required for joining nodes to a cluster. OIDC authentication is optional. Both can be enabled on cluster at the same time. 


IAM OIDC identity providers are entities in IAM that describe an external identity provider (IdP) service that supports the OpenID Connect (OIDC) standard, such as Google or Salesforce. You use an IAM OIDC identity provider when you want to establish trust between an OIDC-compatible IdP and your AWS account. This is useful when creating a mobile app or web application that requires access to AWS resources, but you don't want to create custom sign-in code or manage your own user identities. 

You can create and manage an IAM OIDC identity provider using the:AWS Management Console, the AWS Command Line Interface, the Tools for Windows PowerShell, or the IAM API.

After you create an IAM OIDC identity provider, you must create one or more IAM roles. A role is an identity in AWS that doesn't have its own credentials (as a user does). But in this context, a role is dynamically assigned to a federated user that is authenticated by your organization's IdP. The role permits your organization's IdP to request temporary security credentials for access to AWS. The policies assigned to the role determine what the federated users are allowed to do in AWS.  


Kubernetes workloads access to AWS


A workload is an application running in one or more Kubernetes pods.

A Kubernetes service account provides an identity for processes that run in a Pod.

If your Pod needs access to AWS services, you can map the service account to an IAM identity to grant that access.

Granting IAM permissions to workloads on Amazon Elastic Kubernetes Service clusters


Amazon EKS provides two ways to grant IAM permissions to workloads that run in Amazon EKS clusters:
  • IAM roles for service accounts (IRSA)
    • Old way
    • Allows pods to directly use IAM Roles (no need to inject into pods IAM User access credentials anymore)
    • We define the trust relationship between an IAM role and Kubernetes service account (that's a type of account in Kubernetes) in the role's trust policy.
    • Each EKS cluster has an OpenID Connect (OIDC) issuer URL associated with it. 
    • To use/enable IRSA a unique OpenID Connect provider needs to be created for each EKS cluster in IAM. 
  • EKS Pod Identities
    • Modern approach

IAM roles for service accounts (IRSA)


What are Service Accounts?


An AWS EKS cluster service account is a Kubernetes identity assigned to pods, allowing them to authenticate with the (cluster) API server. EKS enhances this by enabling service accounts to assume IAM roles (IRSA - IAM Roles for Service Accounts), providing fine-grained, secure AWS permission access to containers without managing long-lived credentials. 

Key Aspects of EKS Service Accounts:
  • Identity & Security: Acts as a non-human identity within the cluster for applications to interact with Kubernetes APIs or external AWS services.
  • IRSA (IAM Roles for Service Accounts): EKS creates an OIDC provider, allowing Kubernetes service accounts to map directly to AWS IAM roles. Pods use this association to get temporary credentials for services like S3, DynamoDB, etc..
  • EKS Pod Identity: A newer, simpler alternative to IRSA that uses an agent to manage credentials directly, bypassing the need for OIDC configuration.
  • Management: Defined within Kubernetes manifests (ServiceAccount resource) and linked to IAM policies via OIDC provider setup or EKS Pod Identity Associations. 

Why Use EKS Service Accounts?


Instead of assigning IAM roles to worker nodes (which gives all pods the same privileges), service accounts follow the principle of least privilege, giving specific permissions only to the pods that require them.


In brief, how IRSA authentication works?


When an AWS SDK inside a pod needs to access a resource (like an S3 bucket for Loki), it doesn't just send a simple "I am Loki" message. It performs a complex cryptographic handshake called OIDC Federation.

Here is exactly what is sent, what is inside the token, and how STS "connects the dots."

1. What the SDK sends to STS

The SDK calls the AssumeRoleWithWebIdentity API. It sends three primary things:
  • RoleArn: The ARN of the IAM Role it wants to assume (e.g., your geeiq-prod-monitoring-k8s-grafana-loki role).
  • RoleSessionName: A unique name for the session (usually the pod name).
  • WebIdentityToken: This is the most important part—the actual "Identity Card" (JWT) mounted at /var/run/secrets/eks.amazonaws.com/serviceaccount/token.

2. What is inside that Token?

The token is a JSON Web Token (JWT) signed by your EKS cluster's private key. If you were to decode it, you would see a payload like this:


{
  "iss": "https://oidc.eks.us-east-2.amazonaws.com/id/570323FD881F43322B5CD6D7693E76DB",
  "sub": "system:serviceaccount:grafana-loki:grafana-loki",
  "aud": "sts.amazonaws.com",
  "exp": 1740000000,
  "iat": 1739996400,
  "kubernetes.io/namespace": "grafana-loki",
  "kubernetes.io/serviceaccount/name": "grafana-loki",
  "kubernetes.io/pod/name": "loki-write-0"
}

  • iss (Issuer): The URL of your EKS OIDC server. This tells STS exactly who issued the token.
  • sub (Subject): The unique identity of the pod (Namespace + ServiceAccount name).
  • aud (Audience): This specifies who the token is intended for. This is why your previous IAM fix was so important. If the token says the audience is sts.amazonaws.com, but your IAM policy doesn't require it, the handshake fails.

3. How does STS know which IAM OIDC Provider to talk to?

This is where the "match" we looked at earlier happens:

  1. Extracting the Issuer: STS looks at the iss field in the incoming token.
  2. Lookup: STS searches your AWS Account's IAM Identity Providers for a provider that matches that iss URL character-for-character.
  3. Signature Verification: Once STS finds the matching IAM Provider, it uses the Thumbprint (the SSL fingerprint) to go to the EKS OIDC URL and download the Public Keys.
  4. Cryptographic Proof: STS uses those public keys to verify that the token was indeed signed by your specific EKS cluster's private key. If the signature is valid, STS knows the token hasn't been tampered with.
  5. Policy Validation: Finally, STS checks the Trust Relationship on the role you requested. It ensures that the sub and aud in the token match the StringEquals conditions in your role's JSON.

AWS SDK in pods needs to be authenticated against STS so AWS SDK on pods can access AWS resources.

Even though you create the Identity Provider resource in the IAM console, the EKS cluster is the one doing all the actual "work" of identifying the pods.

Think of it like a Passport Office and a Border Agent:
  • EKS (The Passport Office): The cluster holds the private key. It issues "passports" (JWT tokens) to pods. EKS is source of truth.
  • IAM (The Border Agent): IAM doesn't issue the passports, but it has a record (the Identity Provider resource) of what a "valid" passport from your specific cluster should look like.

1. How EKS becomes the "Issuer"

Every EKS cluster runs a tiny, public-facing web server called the OIDC Discovery Endpoint.
  • The URL: This is that https://oidc.eks... URL we discussed.
  • The Keys: If you visit that URL (specifically the /.well-known/openid-configuration path), EKS provides a list of public keys.
  • The Signing: When a pod starts, EKS creates a token and signs it using its private key. Only your cluster has this private key.

2. Why you create the resource in IAM

IAM is globally shared across your AWS account. It doesn't know your EKS cluster exists until you tell it. By creating the Identity Provider in IAM, you are essentially saying:

"Hey IAM, if someone shows up with a token signed by the keys found at this EKS URL, I want you to consider that a valid identity."

3. The Step-by-Step Identity Exchange

This is exactly how your application pod is supposed to get its e.g.  S3 permissions:

  1. The Token: EKS mounts a projected volume into the App pod containing a signed token (the "passport").
  2. The Request: App sends this token to AWS STS (Security Token Service) and says, "I want to assume the role mycorp-role"
  3. The Validation: STS looks at the iss (issuer) field in the token. It sees your EKS URL.
  4. The Trust Check: STS looks at IAM Identity Providers. It finds the one you created that matches that URL.
  5. The Signature Check: STS fetches the public key from the EKS URL and verifies that the token was actually signed by your cluster.
  6. The Condition Check: STS checks the Trust Relationship on the role to ensure the "Subject" matches system:serviceaccount:my-app:my-app.


In 2014, AWS Identity and Access Management added support for federated identities using OpenID Connect (OIDC). This feature allows you to authenticate AWS API calls with supported identity providers and receive a valid OIDC JSON web token (JWT). You can pass this token to the AWS STS AssumeRoleWithWebIdentity API operation and receive IAM temporary role credentials. You can use these credentials to interact with any AWS service, including Amazon S3 and DynamoDB.

Each JWT token is signed by a signing key pair. The keys are served on the OIDC provider managed by Amazon EKS and the private key rotates every 7 days. Amazon EKS keeps the public keys until they expire. If you connect external OIDC clients, be aware that you need to refresh the signing keys before the public key expires. 

Kubernetes has long used service accounts as its own internal identity system. Pods can authenticate with the Kubernetes API server using an auto-mounted token (which was a non-OIDC JWT) that only the Kubernetes API server could validate. These legacy service account tokens don't expire, and rotating the signing key is a difficult process. In Kubernetes version 1.12, support was added for a new ProjectedServiceAccountToken feature. This feature is an OIDC JSON web token that also contains the service account identity and supports a configurable audience.

Amazon EKS hosts a public OIDC discovery endpoint for each cluster that contains the signing keys for the ProjectedServiceAccountToken JSON web tokens so external systems, such as IAM, can validate and accept the OIDC tokens that are issued by Kubernetes.

OIDC federation access allows you to assume IAM roles via the Secure Token Service (STS), enabling authentication with an OIDC provider, receiving a JSON Web Token (JWT), which in turn can be used to assume an IAM role. Kubernetes, on the other hand, can issue so-called projected service account tokens, which happen to be valid OIDC JWTs for pods. Our setup equips each pod with a cryptographically-signed token that can be verified by STS against the OIDC provider of your choice to establish the pod’s identity.

new credential provider ”sts:AssumeRoleWithWebIdentity”


IRSA authentication
EKS OIDC IdP-signed JWT gets auto-mounted on each pod which uses service account.
AWS SDK sends AssumeRoleWithWebIdentity request containing the desired role and JWT.
STS uses IAM IdP associated to EKS OIDC IdP in order to verify identity of the pod.  


To use/enable IRSA:

1)  Every EKS cluster which supports IRSA has a unique URL - The OIDC Issuer URL.

Example: https://oidc.eks.us-east-2.amazonaws.com/id/EXAMPLEDATA123
  • If our cluster supports IAM roles for service accounts, it has an OpenID Connect (OIDC) issuer URL associated with it. 
  • We can view this URL in the Amazon EKS console, or we can use the following AWS CLI command to retrieve it.
aws eks describe-cluster --name cluster_name --query "cluster.identity.oidc.issuer" --output text

The expected output is as follows:

https://oidc.eks.<region-code>.amazonaws.com/id/EXAMPLED539D4633E53DE1B716D3041E


2) A unique OpenID Connect provider (OIDC Provider, Identity Provider) needs to be created in IAM for each EKS cluster. [Create an IAM OIDC provider for your cluster - Amazon EKS]

To use IAM roles for service accounts, an IAM OIDC provider must exist for your cluster's OIDC issuer URL. The Issuer URL generated by EKS cluster must be identical to the Provider URL defined in the IAM Identity Provider resource.

AWS uses this match to verify that the security token presented by pod actually came from a trusted source.

1. The "Exact String" Match

AWS IAM is extremely strict about the URL. If your EKS cluster issuer is:
https://oidc.eks.us-east-2.amazonaws.com/id/EXAMPLEDATA123

The Identity Provider in IAM must be configured with that exact string. If there is a trailing slash in one but not the other, or if it uses http instead of https, the match fails, and you get the WebIdentityErr you saw in your logs.


2. The "Thumbprint" (The Security Guard)

Matching the URL is only half the battle. AWS also checks a Thumbprint (a SHA1 hex string).

This is the fingerprint of the SSL certificate used by that URL.

If the certificate at the URL changes (which happens periodically when AWS updates its services), the thumbprint in your IAM Identity Provider must be updated to match.

If our my-app pods are failing with a WebIdentityErr, it's highly likely our cluster was updated/recreated, and the IAM Identity Provider is still holding an old URL or an old Thumbprint.


How to Verify the Match


You can check for a match yourself using the AWS CLI:

Step A: Get the Cluster's URL


aws eks describe-cluster --name <cluster_name> --query "cluster.identity.oidc.issuer" --output text

Step B: List IAM Providers


aws iam list-open-id-connect-providers

Step C: Compare

Pick the ARN from Step B that looks relevant and describe it:

aws iam get-open-id-connect-provider --open-id-connect-provider-arn <ARN_FROM_STEP_B>

Look for the Url field. If it does not match Step A character-for-character, your identity chain is broken.


Any OIDC provider implementation needs to have a public OIDC issuer URL (see Issuer URL in OpenID Connect Discovery should be a working URL? - Stack Overflow). So for each cluster we'll have one implementation of OIDC provider (in IAM).


Your Identity Provider’s Discovery Endpoint contains important configuration information. The OIDC discovery endpoint will always end with /.well-known/openid-configuration as described in the 
OpenID Provider Configuration Request documentation.

You can confirm that the discovery endpoint is correct by entering it in a browser window. If there is a JSON object with metadata about the connection returned, the endpoint is correct.

2) Configure a Kubernetes service account to assume an IAM role
3) Configure Pods to use a Kubernetes service account 
4) Use a supported AWS SDK 


Just like we can create OIDC Identity Provider in IAM for representing an external, 3rd party OIDC Provider so we can allow access to AWS for a user authenticated with that 3rd party OIDC Provider, we can also create OIDC Identity Provider in IAM for representing an internal, EKS OIDC Provider which is available for each cluster (each cluster has its own provider). When EKS cluster is created, its OIDC Provider is also created with two pieces of data available:
  • OIDC Provider issuer
    • has its url which is used for discovery - see the screenshot above
  • OIDC Provider server TLS certificate
    • This certificate protects the url above (OIDC Provider issuer url) and is used for clients to verify the identity of OIDC Provider server
    • TLS certificate is necessary for establishing secure communication with the OIDC provider.

In Terraform, this certificate can be obtained like here:

data "tls_certificate" "example" {
  url = aws_eks_cluster.example.identity[0].oidc[0].issuer
}

To create  OIDC Identity Provider (IdP) in IAM for this cluster-specific OIDC Provider we can use aws_iam_openid_connect_provider :


resource "aws_iam_openid_connect_provider" "example" {
  client_id_list  = ["sts.amazonaws.com"]
  thumbprint_list = [data.tls_certificate.example.certificates[0].sha1_fingerprint]
  url             = aws_eks_cluster.example.identity[0].oidc[0].issuer
}

This resource requires few pieces of information:
  • url  - Describes which OIDC IdP this resource represents. 
    • The URL of the identity provider. Corresponds to the iss claim.
  • thumbprint_list - Describes how will clients communicate with OIDC IdP (servers). HTTP communication goes through TLS secure channel so we need to know the identity of certificates to use.
    •  A list of server certificate thumbprints for the OpenID Connect (OIDC) identity provider's server certificate(s).
    • When we create an OpenID Connect (OIDC) identity provider in IAM, IAM requires the thumbprint for the top intermediate certificate authority (CA) that signed the certificate used by the external identity provider (IdP). The thumbprint is a signature for the CA's certificate that was used to issue the certificate for the OIDC-compatible IdP. When we create an IAM OIDC identity provider, we are trusting identities authenticated by that IdP to have access to our AWS account. By using the CA's certificate thumbprint, we trust any certificate issued by that CA with the same DNS name as the one registered. This eliminates the need to update trusts in each account when we renew the IdP's signing certificate.
  • client_id_list - Describes which clients can use this OIDC IdP
    • A list of client IDs (also known as audiences). When a mobile or web app registers with an OpenID Connect provider, they establish a value that identifies the application. (This is the value that's sent as the client_id parameter on OAuth requests.)

AWS Security Token Service (STS)

  • Web service that enables you to request temporary, limited-privilege credentials for users
  • Available as a global service
  • All AWS STS requests go to a single endpoint at https://sts.amazonaws.com
  • Supports the following actions (requests):
    • AssumeRole
      • Returns a set of temporary security credentials that you can use to access AWS resources. These temporary credentials consist of an access key ID, a secret access key, and a security token. For example, user can authenticate via company's SSO and on AWS sign-on page can get these credentials that can be copied to ~/.aws/credentials under a profile and then this profile is used when accessing AWS.
    • AssumeRoleWithSAML
    • AssumeRoleWithWebIdentity
      • Issues a role session (temporary session)
      • Returns a set of temporary security credentials for users who have been authenticated in a mobile or web application with a web identity provider. Example providers include the OAuth 2.0 providers Login with Amazon and Facebook, or any OpenID Connect-compatible identity provider such as Google or Amazon Cognito federated identities.
      • Calling AssumeRoleWithWebIdentity does not require the use of AWS security credentials. Therefore, you can distribute an application (for example, on mobile devices) that requests temporary security credentials without including long-term AWS credentials in the application. You also don't need to deploy server-based proxy services that use long-term AWS credentials. Instead, the identity of the caller is validated by using a token from the web identity provider. 
      • The temporary security credentials returned by this API consist of an access key ID, a secret access key, and a security token. Applications can use these temporary security credentials to sign calls to AWS service API operations.
      • For example, user can authenticate via company's SSO and on AWS sign-on page can get these credentials that can be copied to ~/.aws/credentials under a profile and then this profile is used when accessing AWS.
      • By default, the temporary security credentials created by AssumeRoleWithWebIdentity last for one hour. However, you can use the optional DurationSeconds parameter to specify the duration of your session. You can provide a value from 900 seconds (15 minutes) up to the maximum session duration setting for the role. This setting can have a value from 1 hour to 12 hours.
      • Required parameters: 
        • RoleArn - The Amazon Resource Name (ARN) of the role that the caller is assuming.
        • RoleSessionName - An identifier for the assumed role session. Typically, you pass the name or identifier that is associated with the user who is using your application. That way, the temporary security credentials that your application will use are associated with that user. This session name is included as part of the ARN and assumed role ID in the AssumedRoleUser response element.
        • WebIdentityToken - The OAuth 2.0 access token or OpenID Connect ID token that is provided by the identity provider. Your application must get this token by authenticating the user who is using your application with a web identity provider before the application makes an AssumeRoleWithWebIdentity call. Timestamps in the token must be formatted as either an integer or a long integer. Only tokens with RSA algorithms (RS256) are supported. 
    • DecodeAuthorizationMessage
    • GetAccessKeyInfo
    • GetCallerIdentity
    • GetFederationToken
    • GetSessionToken


Example: Create an IAM role and associate it with a Kubernetes service account


Our custom service account that we have in cluster, my-service-account requires permission to e.g. launch EC2 instances. We need to assign certain IAM role to this service account (IRSA). 

We've created OIDC IdP in IAM for OIDC IdP associated with our cluster: 

arn:aws:iam::111122223333:oidc-provider/oidc.eks.region-code.amazonaws.com/id/EXAMPLED539D4633E53DE1B71EXAMPLE

Prepare the policies for the role that the IdP-authenticated user will assume. As with any role, a role for a service account includes two policies:
  • trust policy that specifies who can assume the role
  • permissions policy that specifies the AWS actions and resources that the role owner is allowed or denied access to
Trust Policy:

{
    "Version": "2012-10-17",
    "Statement": [
        {
            "Effect": "Allow",
            "Principal": {
                "Federated": "arn:aws:iam::111122223333:oidc-provider/oidc.eks.region-code.amazonaws.com/id/EXAMPLED539D4633E53DE1B71EXAMPLE"
            },
            "Action": "sts:AssumeRoleWithWebIdentity",
            "Condition": {
                "StringEquals": {
                    "oidc.eks.region-code.amazonaws.com/id/EXAMPLED539D4633E53DE1B71EXAMPLE:sub": "system:serviceaccount:default:my-service-account",
                    "oidc.eks.region-code.amazonaws.com/id/EXAMPLED539D4633E53DE1B71EXAMPLE:aud": "sts.amazonaws.com"
                }
            }
        }
    ]
}

Principal here is OIDC session principal which is a role session principal, see https://docs.aws.amazon.com/IAM/latest/UserGuide/reference_policies_elements_principal.html#sts-session-principals.

This allows anyone who's authenticated with this OIDC IdP and who has my-service-account as the subject (user) and sts.amazonaws.com as the audience (client) in the WebIdentityToken (sent as the parameter of this request)  to be able to assume the role that has this policy attached to it.

Our service account authenticates with cluster's OIDC provider (IdP) and from it gets the token. This is Identity Token mentioned in OpenID Connect (OIDC) | My Public Notepad and it contains sub (subject identity, service account in our case) and aud (audience - client - who'll be using this token; STS in our case) claims.

It then sends AssumeRoleWithWebIdentity request with this token and role it requires (e.g. role for creating EC2 instances) to STS. STS (Client) then uses this token against EKS cluster IdP to identify user (service account) and finally to grant it a role. 


Saturday, 1 June 2024

Deploying Microservices Application on the AWS EKS with AWS Console and kubectl


Introduction


One of my previous articles, Deploying Microservices Application on the Minikube Kubernetes cluster | My Public Notepad, shows how to use kubectl to deploy a microservices application (Cats/Dogs Voting application) onto a single-node cluster which runs in VM on the local machine and which is created by Minikube.

In Provisioning multi-node cluster on the local machine using Kubeadm and Vagrant | My Public Notepad it is discussed how to use Vagrant to launch multiple VMs on the local machine, each of them hosting a node from the multi-node cluster created and managed by Kubeadm. 

The next example would be using Kubeadm to provision multi-node cluster running on multiple bare-metal machines and then using kubectl to deploy a microservices application on that cluster. That will be a topic for one of my future articles but today I want to share my experience with using AWS Console to provision a multi-node cluster in Amazon Elastic Kubernetes Service (EKS) and then kubectl to deploy a microservices application (Cats/Dogs Voting application) onto it. 


I will try to maximise use of AWS Free Tier but note that this setup will incur some charges and therefore make sure you destroy chargeable resources (I'll list them down in the article) as soon as successfully complete the test of the application deployment.

Prerequisites:

  • AWS:
    • An account is created
    • IAM User that kubectl will be using to authenticate to AWS. As I'm planning later to use Terraform to provison the infrastructure for a similar demo, I created IAM user named terraform but in this article we won't be using Terraform at all and this user name can be any arbitrary name.
  • Local machine:
    • AWS CLI is installed and configured
    • kubectl is installed

Creating a cluster in EKS Dashboard in AWS Console 


We'll perform the following steps in order to create an EKS cluster:
  • create IAM role for cluster
  • create a cluster
  • crate IAM role for (worker) nodes
  • create (worker) node group

This is how looks the main EKS page:


As Getting started with Amazon EKS – AWS Management Console and AWS CLI - Amazon EKS and Amazon EKS cluster IAM role - Amazon EKS describe, before we create a cluster we need to create an IAM Role which needs to have these two policies attached:

1) AmazonEKSServicePolicy - AWS Managed Policy - defines permissions of this role (what resources can access anyone who assumes this role)
2) trust policy (which defines who can assume/take this role). Role needs to have this piece of information attached to it as if anyone could assume it, that would defeat the purpose of roles. We want to allow EKS service to assume it so this policy should be attached to it: 

{
  "Version": "2012-10-17",
  "Statement": [
    {
      "Effect": "Allow",
      "Principal": {
        "Service": "eks.amazonaws.com"
      },
      "Action": "sts:AssumeRole"
    }
  ]
}

We can name this role eksClusterRole.

This is the role in AWS Console:


We can now go back to EKS main page, click on Add cluster and then select Create.

We are now presented with the first out of six steps in creating the cluster with some fields set to default values. Note that cluster service role is also set automatically to the one I created above otherwise it would have been empty. When using AWS Console, make sure that you've selected the desired cluster region in the upper right corner:


Cluster configuration


From the provided info on the AWS Console page:

An Amazon EKS cluster consists of two primary components:

1. The Amazon EKS control plane which consists of control plane nodes that run the Kubernetes software, such as etcd and the Kubernetes API server. These components run in AWS owned accounts.

2. A data plane made up of Amazon EKS worker nodes or Fargate compute registered to the control plane. Worker nodes run in customer accounts; Fargate compute runs in AWS owned accounts.

Follow these steps to create an Amazon EKS control plane. After your control plane is created, you can attach worker nodes or use Fargate to run pods.

In this demo we'll be running worker nodes in Amazon EKS, in our account.

Cluster configuration has the following settings:
  • Name
  • Kubernetes version
  • Cluster service role

Let's explore each of them.

Name

  • a unique name for this cluster
  • we can set it to example-voting-app

Kubernetes version

Kubernetes version for this cluster.

From the AWS Console info:
Kubernetes rapidly evolves with new features, design updates, and bug fixes. In general, the community releases new Kubernetes minor versions (1.XX) approximately every four months. As new Kubernetes versions become available in Amazon EKS, we recommend that you proactively update your clusters to use the latest available version.

After a minor version is first released, it's under standard support in Amazon EKS for the first 14 months. Once a version is past the end of standard support date, it automatically enters extended support for the next 12 months. Extended support allows you to stay at a specific Kubernetes version for longer but at additional cost. If you haven't updated your cluster before the extended support period ends, your cluster is auto-upgraded to the oldest currently supported extended version.

We recommend that you create your cluster with the latest available Kubernetes version supported by Amazon EKS. If your application requires a specific version of Kubernetes, you can select older versions. You can do this even for versions that have entered extended support.

 We'll leave the value set by default. 


Cluster service role


IAM role to allow the Kubernetes control plane to manage AWS resources on your behalf. This property cannot be changed after the cluster is created. 

From the AWS Console info:
AWS Identity and Access Management (IAM) is an AWS service that helps an administrator securely control access to AWS resources. An IAM role is an identity within your AWS account that has specific permissions. You can use roles to delegate access to users, applications, or services that do not normally have access to your AWS resources.

An Amazon EKS cluster has multiple IAM roles that define access to resources.
  • The Cluster Service Role allows the Kubernetes cluster managed by Amazon EKS to make calls to other AWS services on your behalf.
  • The Amazon EKS service-linked role includes the permissions that EKS requires to create and manage clusters. This role is created for you automatically during cluster creation.
AWS Console has done job for us and selected the role we created earlier - eksClusterRole.


Cluster access


From the AWS console info:

Kubernetes cluster administrator access

By default, Amazon EKS creates an access entry that associates the AmazonEKSClusterAdminPolicy access policy to the IAM principal creating the cluster.

Any IAM principal assigned the IAM permission to create access entries can create an access entry that provides cluster access to any IAM principal after cluster creation. For more information see Access entries

Bootstrap cluster administrator access

Choose whether the IAM principal creating the cluster has Kubernetes cluster administrator access.

Bootstrap cluster administrator access can only be set at cluster creation. If you set the admin bootstrap parameter to True, then EKS will automatically create a cluster admin access entry on your behalf. This parameter can be set independent of cluster authentication mode.

We'll leave here default selection: Allow cluster administrator access for your IAM principal.


Cluster authentication mode

Before using EKS access entry APIs, you must opt in. This can be modified on existing clusters or done when creating new clusters. On an established cluster, changing authentication modes is a one-way operation. You can change between API_AND_CONFIG_MAP and CONFIG_MAP. Then you can change to API from API_AND_CONFIG_MAP. These operations can't be reversed in the opposite direction. Meaning that once you convert to API, you cannot go back to CONFIG_MAP or API_AND_CONFIG_MAP. Additionally, you can't change from API_AND_CONFIG_MAP to CONFIG_MAP.

We'll leave the default selection: EKS API and ConfigMap - The cluster will source authenticated IAM principals from both EKS access entry APIs and the aws-auth ConfigMap.


Secrets encryption


From the AWS Console info:
Once turned on, secrets encryption cannot be modified or removed.

Enabling secrets encryption allows you to use AWS Key Management Service (AWS KMS) keys to provide envelope encryption of Kubernetes secrets stored in etcd for your cluster. This encryption is in addition to the Amazon EBS volume encryption that is enabled by default for all data (including secrets) that is stored in etcd as part of an Amazon EKS cluster. Using secrets encryption for your Amazon EKS cluster allows you to deploy a defense in depth strategy for Kubernetes applications by encrypting Kubernetes secrets with a AWS KMS key that you define and manage.

Using secrets encryption with AWS KMS to create an encryption key in the same Region as your cluster or use an existing key. You cannot modify or remove encryption from a cluster once it has been enabled. All Kubernetes secrets stored in the cluster where secrets encryption is enabled will be encrypted with the AWS KMS key you provide.

We'll keep the default selection which is OFF/Disabled for Turn on envelope encryption of Kubernetes secrets using KMS - Envelope encryption provides an additional layer of encryption for your Kubernetes secrets.


Tags


For the sake of simplicity, we won't set any tags.


Specify Networking


The next page leads us to EKS cluster networking settings:
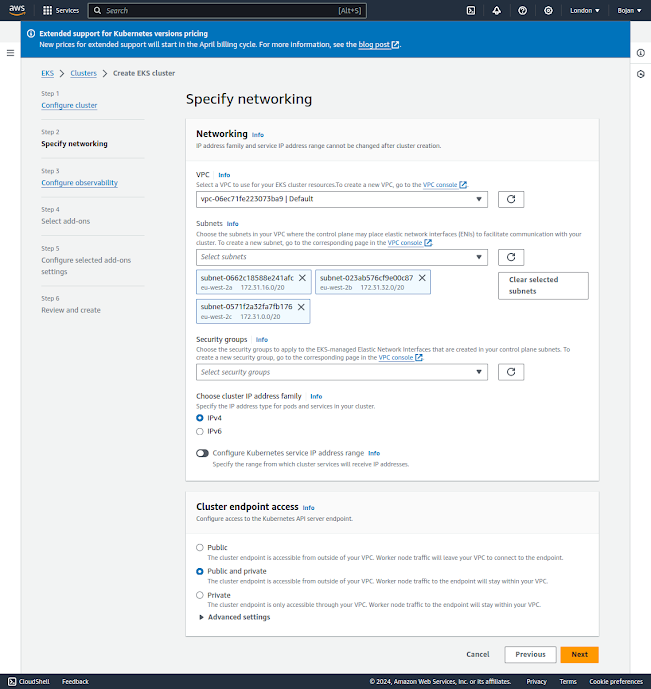


Networking 


IP address family and service IP address range cannot be changed after cluster creation.

Amazon Virtual Private Cloud (Amazon VPC) enables you to launch AWS resources into a virtual network that you have defined. This virtual network closely resembles a traditional network that you would operate in your own data center, with the benefits of using the scalable infrastructure of AWS. A virtual private cloud (VPC) is a virtual network dedicated to your AWS account. A subnet is a range of IP addresses in your VPC. Each Managed Node Group requires you to specify one of more subnets that are defined within the VPC used by the Amazon EKS cluster. Nodes are launched into subnets that you provide. The size of your subnets determines the number of nodes and pods that you can run within them. You can run nodes across multiple AWS availability zones by providing multiple subnets that are each associated different availability zones. Nodes are distributed evenly across all of the designated Availability Zones. If you are using the Kubernetes cluster autoscaler and running stateful pods, you should create one Node Group for each availability zone using a single subnet and enable the -\-balance-similar-node-groups feature in cluster autoscaler.


VPC


A VPC to use for your EKS cluster resources.

We'll use a default VPC which is already selected.

Subnets


Choose the subnets in your VPC where the control plane may place elastic network interfaces (ENIs) to facilitate communication with your cluster. 

Choose the subnets in your VPC where the control plane may place elastic network interfaces (ENIs) to facilitate communication with your cluster. The specified subnets must span at least two availability zones.

To control exactly where the ENIs will be placed, specify only two subnets, each from a different AZ, and EKS will place cross-account ENIs in those subnets. The Amazon EKS control plane creates up to 4 cross-account ENIs in your VPC for each cluster.

You may choose one set of subnets for the control plane that are specified as part of cluster creation, and a different set of subnets for the worker nodes.

If you select IPv6 cluster address family, the subnets specified as part of cluster creation must contain an IPv6 CIDR block.

We'll stick to defaults, which a list of all default subnets in default VPC.

Security groups

Security groups to apply to the EKS-managed Elastic Network Interfaces that are created in your control plane subnets. 

Security groups control communications within the Amazon EKS cluster including between the managed Kubernetes control plane and compute resources in your AWS account such as worker nodes and Fargate pods.

The Cluster Security Group is a unified security group that is used to control communications between the Kubernetes control plane and compute resources on the cluster. The cluster security group is applied by default to the Kubernetes control plane managed by Amazon EKS as well as any managed compute resources created through the Amazon EKS API.

Additional cluster security groups control communications from the Kubernetes control plane to compute resources in your account.
Worker node security groups are security groups applied to unmanaged worker nodes that control communications from worker nodes to the Kubernetes control plane.
We won't be using any security groups. This is not a good practice but we're doing it only for the sake of simplicity.

Choose cluster IP address family


The IP address type for pods and services in your cluster.

Select the IP address type that pods and services in your cluster will receive.

Amazon EKS does not support dual stack clusters. However, if your worker nodes contain an IPv4 address, EKS will configure IPv6 pod routing so that pods can communicate with cluster external IPv4 endpoints.

We'll stick to default selection: IPv4

Configure Kubernetes service IP address range

Specify the range from which cluster services will receive IP addresses.

Configure the IP address range from which cluster services will receive IP addresses. Manually configuring this range can help prevent conflicts between Kubernetes services and other networks peered or connected to your VPC.

Enter a range in IPv4 CIDR notation (for example, 10.2.0.0/16).

It must satisfy the following requirements:
  • This range must be within an IPv4 RFC-1918 network range.
  • Minimum allowed size is /24, maximum allowed size is /12.
  • This range cannot overlap with the range of the VPC for your EKS Resources.
  • Service CIDR is only configurable when choosing ipv4 as your cluster IP address family. With IPv6, the service CIDR will be an auto generated unique local address (ULA) range.
We won't be using this option. 


Cluster endpoint access


Configure access to the Kubernetes API server endpoint


You can limit, or completely disable, public access from the internet to your Kubernetes cluster endpoint.

Amazon EKS creates an endpoint for the managed Kubernetes API server that you use to communicate with your cluster (using Kubernetes management tools such as kubectl). By default, this API server endpoint is public to the internet, and access to the API server is secured using a combination of AWS Identity and Access Management (IAM) and native Kubernetes Role Based Access Control (RBAC).

You can, optionally, limit the CIDR blocks that can access the public endpoint. If you limit access to specific CIDR blocks, then it is recommended that you also enable the private endpoint, or ensure that the CIDR blocks that you specify include the addresses that worker nodes and Fargate pods (if you use them) access the public endpoint from.

You can enable private access to the Kubernetes API server so that all communication between your worker nodes and the API server stays within your VPC. You can limit the IP addresses that can access your API server from the internet, or completely disable internet access to the API server.

We'll use default selection which is: Public and private - The cluster endpoint is accessible from outside of your VPC. Worker node traffic to the endpoint will stay within your VPC.

Advanced settings >> Add/edit sources to public access endpoint

Public access endpoint sources 
Determines the traffic that can reach your endpoint.

Use CIDR notation to specify an IP address range (for example, 203.0.113.5/32).
If connecting from behind a firewall, you'll need the IP address range used by the client computers.
By default, your public endpoint is accessible from anywhere on the internet (0.0.0.0/0).
If you restrict access to your public endpoint using CIDR blocks, it is strongly recommended to also enable private endpoint access so worker nodes and/or Fargate pods can communicate with the cluster. Without the private endpoint enabled, your public access endpoint CIDR sources must include the egress sources from your VPC. For example, if you have a worker node in a private subnet that communicates to the internet through a NAT Gateway, you will need to add the outbound IP address of the NAT Gateway as part of a allowlisted CIDR block on your public endpoint.

We'll leave a default CIDR block which is set to 0.0.0.0/0.

The next page in EKS cluster setup is about Observability and we'll leave it disabled:


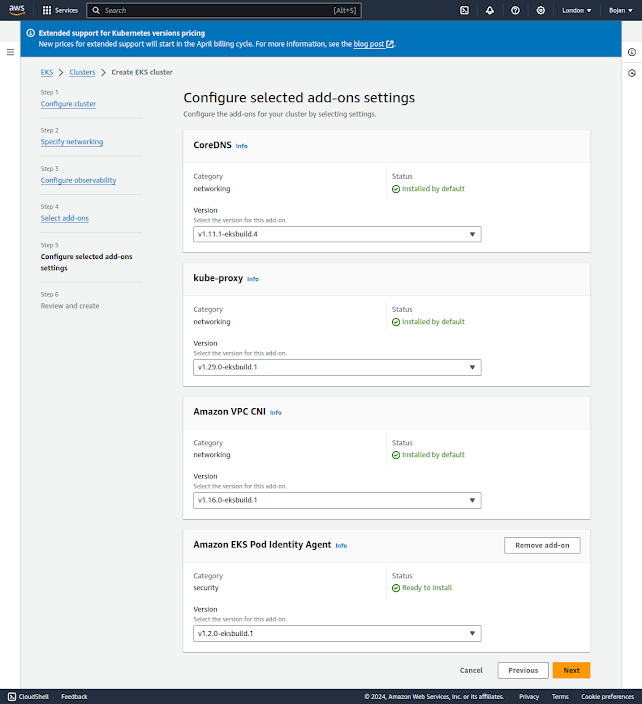
We'll also leave default add-ons:


...and also keep their default settings:


Finally, we can review EKS cluster settings before creating it:


If we click Create, we might get an error like this (in case we used us-east-1 region):


The fix is obvious: remove the subnet which belongs to us-east-1e AZ.

Our cluster is now in process of creation which takes some time (~10 minutes):


Notice the message in the blue ribbon: Managed node group and Fargate profile cannot be added while the cluster example-voting-app is being created. Please wait.

This actually gives us a hint what will actually be the next step: adding Managed Node Group. This is done from Compute tab >> Node Groups >> Add node group but during cluster creation this button is disabled:


After some time we can see that our cluster is active and blue ribbon suggest: Next step: Provision compute capacity for your cluster by adding a Managed node group or creating a Fargate profile.


We'll add a Managed node group but before that we need to add a new IAM Role, the one which will be used by worker nodes. 

Amazon EKS node IAM role - Amazon EKS states that this role needs to have these policies attached:

{
  "Version": "2012-10-17",
  "Statement": [
    {
      "Effect": "Allow",
      "Principal": {
        "Service": "ec2.amazonaws.com"
      },
      "Action": "sts:AssumeRole"
    }
  ]
}

We can name it eksNodeRole:


Let's now click on Add Node Group.

We can name the group as e.g. demo-workers. And we'll leave all settings as set by default.


On the next page we need to specify EC2 instances in the node group:


Node group compute configuration


We can leave AMI type as selected by default (Nodegroup - Amazon EKS).

t2.micro is the only instance type available in free tier BUT it does not meet performance criteria for Kubernetes node (see kubernetes - Pod creation in EKS cluster fails with FailedScheduling error - Stack Overflowamazon-eks-ami/files/eni-max-pods.txt at pinned-cache · awslabs/amazon-eks-ami). That why we should specify t2.medium or t3.medium.

Node group scaling configuration


EKS is using EC2 Auto-Scaling Groups for scaling up.  This is a configuration for Auto-Scaling Group and we can leave 2 as the desired, minimum and maximum number of nodes.


In the next step we can specify subnets:


We can now review the setting and hit the Create button:


Nodes are now being created:


Nodes are now created:


I have IAM User named terraform which has Admin privileges and whose profile is in ~/.aws/credentials. Let's set kubectl configuration so this profile is used for authentication with the cluster:

$ aws eks --region eu-west-2 update-kubeconfig --name example-voting-app --profile=terraform
Updated context arn:aws:eks:eu-west-2:471112786618:cluster/example-voting-app in /home/bojan/.kube/config

$ kubectl get deploy,svc
E0531 15:52:54.698454  728981 memcache.go:265] couldn't get current server API group list: the server has asked for the client to provide credentials
E0531 15:52:55.525187  728981 memcache.go:265] couldn't get current server API group list: the server has asked for the client to provide credentials
E0531 15:52:56.374505  728981 memcache.go:265] couldn't get current server API group list: the server has asked for the client to provide credentials

Let's check who has cluster access:


I created this cluster after authenticating to AWS Console via root account. Not the best practice but acceptable for this demo. We need to grant terraform user the access:


Adding access policy is option so let's skip it to check the access without it:


Only adding this user makes it "visible" to the cluster but it still does not have required permissions to access it:

$ aws eks --region eu-west-2 update-kubeconfig --name example-voting-app --profile=terraform
Updated context arn:aws:eks:eu-west-2:471112786618:cluster/example-voting-app in /home/bojan/.kube/config

$ kubectl get deploy,svc
Error from server (Forbidden): deployments.apps is forbidden: User "terraform" cannot list resource "deployments" in API group "apps" in the namespace "default"
Error from server (Forbidden): services is forbidden: User "terraform" cannot list resource "services" in API group "" in the namespace "default"

Let's add access policy which allows terraform user admin privileges over this cluster:


Let's now update kubectl configuration:

$ aws eks --region eu-west-2 update-kubeconfig --name example-voting-app --profile=terraform
Updated context arn:aws:eks:eu-west-2:471112786618:cluster/example-voting-app in /home/bojan/.kube/config

kubectl is now able to authenticate and access the cluster:

$ kubectl get deploy,svc
NAME                 TYPE        CLUSTER-IP   EXTERNAL-IP   PORT(S)   AGE
service/kubernetes   ClusterIP   10.100.0.1   <none>        443/TCP   36m

$ kubectl get nodes
NAME                                         STATUS   ROLES    AGE   VERSION
ip-172-31-24-6.eu-west-2.compute.internal    Ready    <none>   21m   v1.29.3-eks-ae9a62a
ip-172-31-41-85.eu-west-2.compute.internal   Ready    <none>   20m   v1.29.3-eks-ae9a62a

We are now ready to deploy microservices.


Deploying Microservices Application onto Cluster


Let's clone my repository and follow the instructions from README file in https://github.com/BojanKomazec/kubernetes-demo/tree/main/aws-eks/voting-app-via-deployments:


$ kubectl create -f ./minikube/voting-app-via-deployments/deployment/voting-app-deployment.yaml
deployment.apps/voting-app-deploy created

$ kubectl create -f ./aws-eks/voting-app-via-deployments/service/voting-app-service-lb.yaml
service/voting-service created

$ kubectl create -f ./minikube/voting-app-via-deployments/deployment/redis-deployment.yaml
deployment.apps/redis-deploy created

$ kubectl create -f ./minikube/voting-app-via-deployments/service/redis-service.yaml
service/redis created

$ kubectl create -f ./minikube/voting-app-via-deployments/deployment/postgres-deployment.yaml
deployment.apps/postgres-deploy created

$ kubectl create -f ./minikube/voting-app-via-deployments/service/postgres-service.yaml
service/db created

$ kubectl create -f ./minikube/voting-app-via-deployments/deployment/worker-app-deployment.yaml
deployment.apps/worker-app-deploy created

$ kubectl create -f ./minikube/voting-app-via-deployments/deployment/result-app-deployment.yaml
deployment.apps/result-app-deploy created

$ kubectl create -f ./aws-eks/voting-app-via-deployments/service/result-app-service-lb.yaml
service/result-service created

After this, let's list all deployments and services:

$ kubectl get deploy,svc
NAME                                READY   UP-TO-DATE   AVAILABLE   AGE
deployment.apps/postgres-deploy     1/1     1            1           10m
deployment.apps/redis-deploy        1/1     1            1           10m
deployment.apps/result-app-deploy   1/1     1            1           9m30s
deployment.apps/voting-app-deploy   1/1     1            1           11m
deployment.apps/worker-app-deploy   1/1     1            1           9m40s

NAME                     TYPE           CLUSTER-IP       EXTERNAL-IP                                                               PORT(S)        AGE
service/db               ClusterIP      10.100.83.137    <none>                                                                    5432/TCP       9m57s
service/kubernetes       ClusterIP      10.100.0.1       <none>                                                                    443/TCP        49m
service/redis            ClusterIP      10.100.6.81      <none>                                                                    6379/TCP       10m
service/result-service   LoadBalancer   10.100.240.125   aece82f931be943b5a39b5618d5e031e-1908252912.eu-west-2.elb.amazonaws.com   80:32258/TCP   9m1s
service/voting-service   LoadBalancer   10.100.141.70    aa5334971f30642dea469ec8d3255e35-790812881.eu-west-2.elb.amazonaws.com    80:32386/TCP   10m


Review created Kubernetes objects 


Before we test this application let's explore and view some Kubernetes objects created around this cluster in AWS Console.

Pods in kube-system namespace:


Pods in default namespace:


ReplicaSets:


Deployments:


Cluster nodes:


We can get information for each node in detail:


Namespaces:


API Services:


Services:


db service details:


redis service:


voting service:


Endpoints:


voting service endpoint:


result service endpoint:


Cluster roles:


Roles:


Cluster overall:


Add-ons:


Node groups:


Reviewing Implicitly Created AWS EC2 Resources 


When we create a Kubernetes cluster, EKS is underneath provisioning other AWS services to support Kubernetes architecture and features:

  • computing (worker nodes): EC2 instances and Volumes
  • LoadBalancing services: EC2 Load Balancers
  • auto-scaling feature: EC2 Auto Scaling Groups
  • Security Groups


EC2 Instances:


Load balancers:


Listeners:


Network mapping:

Security:


Health checks:


Target instances:


Monitoring:


LB Attributes:


Auto Scaling Groups:


Volumes:


Security Groups:


Testing the deployment 


We saw earlier external IPs for our Voting and Result service which are all behind the load balancer:
  • service/voting-service: aa5334971f30642dea469ec8d3255e35-790812881.eu-west-2.elb.amazonaws.com  
  • service/result-service: aece82f931be943b5a39b5618d5e031e-1908252912.eu-west-2.elb.amazonaws.com 
Let's copy these addresses and use http (port 80) protocol in the browser:

http://aa5334971f30642dea469ec8d3255e35-790812881.eu-west-2.elb.amazonaws.com


If we vote for cats we can see the result here:

http://aece82f931be943b5a39b5618d5e031e-1908252912.eu-west-2.elb.amazonaws.com 


Let's now vote for dogs:


And then check the result:


Destroying Resources


Let's now destroy cost-bearing infra objects.


We'll start with node group:


Let's now destroy cluster:


We can check the progress:


We can also check that all EC2 resources have been destroyed:


WARNING: Make sure Load Balancers created during this exercise are also destroyed. 

More general rule: Delete all deployed Kubernetes services before deleting node groups and clusters.

In my case, Load Balancers were left intact after I performed above described deletion of EKS resources.


If you have active services in your cluster that are associated with a load balancer, you must delete those services before deleting the cluster so that the load balancers are deleted properly. Otherwise, you can have orphaned resources in your VPC that prevent you from being able to delete the VPC.


When you create a Service resource with LoadBalancer as a type, EKS asks the ELB service to create an external load balancer. It depends on how you create a Service, but in the end, the ELB service will create a Classic Load Balancer(CLB) or Network Load Balancer(NLB) for you. If you delete the cluster before deleting the Load Balancers first, they will remain in your account, and you may be charged for them.

Make sure to delete all load balancers created from within Kubernetes.

To find LoadBalancer services:

    kubectl get svc -A | grep LoadBalancer

To delete a service resource:

    kubectl -n NAMESPACE delete svc NAME

This is exactly what I missed to do before I deleted the node group and the cluster.

Prior to cluster destruction I should have deleted all LoadBalancer services:

kubectl destroy -f  ./aws-eks/voting-app-via-deployments/service/voting-app-service-lb.yaml
service/voting-service created

kubectl destroy -f  ./aws-eks/voting-app-via-deployments/service/result-app-service-lb.yaml
service/result-service created

Load Balancers get assigned Public IPv4 address and are chargeable, even if Free Tier is still available.

A configured Load Balancer continues to accrue charges, till you delete it.

Today AWS announced new charges for AWS-provided public IPv4 addresses beginning February 1, 2024.

Types of AWS public IPv4 addresses

1.  Amazon Elastic Compute Cloud (EC2) public IPv4 addresses
When you launch AWS resources in a default Amazon Virtual Private Cloud (VPC), or in subnets that have the auto-assign public IP address setting enabled, they automatically receive public IPv4 addresses from the Amazon pool. 

2.  Elastic IP addresses
An Elastic IP address is a public IPv4 address you can allocate to your AWS account, as opposed to a specific resource.

3. Service managed public IPv4 addresses
AWS managed services that are deployed in your account, such as internet-facing Elastic Load Balancers, NAT gateways, or AWS Global Accelerators, make use of public IPv4 addresses from the Amazon-owned pool. When you deploy managed services in subnets with the auto-assign public IP option enabled, they automatically receive public IPv4 addresses. 

4. BYOIP addresses
There is no charge for using your own IPv4 addresses.

In the updated CUR you will see two new usage types for public IPv4 addresses:
  • PublicIPv4:IdleAddress: shows usage across all public IPv4 addresses that are idle in your AWS account
  • PublicIPv4:InUseAddress: shows usage across all public IPv4 addresses that are in-use by your AWS resources. These include EC2 public IPv4 addresses, Elastic IP addresses, and service managed public IPv4 addresses. It does not include BYOIPs, as there is no charge for using BYOIP addresses.


AWS Free Tier for Amazon EC2 applies to in-use public IPv4 address usage. Usage beyond 750 hours per month of in-use public IPv4 address will be charged at $0.005 per IP per hour as announced in this AWS News blog. 

While there is no additional charge for creating and using an Amazon Virtual Private Cloud (VPC) itself, you can pay for optional VPC capabilities with usage-based charges.

Also see: 

I discovered this resource leak when I was checking my AWS costs:


It was not obvious what exactly in VPC was consuming public IPv4 addresses. VPC on its own and its public subnets (even with Auto-assign IPv4 Address enabled) do not incur any costs. But when I checked EC2 resources, I notices I had those 2 Load Balances created as part of today's exercise up and running. 


$0.005 x 24h x 2 = $0.24

This is exactly daily charge I was having. 

Public IP Insights [View public IP insights - Amazon Virtual Private Cloud], a free feature with in Amazon VPC IP Address Manager (IPAM) also showed that I had some public IP addresses in use:


I've now deleted both Load Balancers: